 Photoshop (from Adobe) is one of the most powerful and interesting graphics editing software available. With a few keystrokes you can take a mediocre photo to a great one, create a logo for your company or personalize your Twitter background. I’ve been using Photoshop for almost 15 years, way back when it was just Photoshop 3.0 and pirated copies were traded on the university ethernet. Um, or you bought a copy with your student discount.
Even now the cost of Photoshop is enough to make your jaw drop (from $200 to $1400), and therefore it is quite an investment to use for those that are casually interested in improving their photos or images.
This year, when I switched to a Mac (thanks to the Vista-XP-Windows7 Bermuda Triangle fiasco) the thing I was most reluctant to leave behind was my working copy of Photoshop.
GIMP (The GNU Image Manipulation Program) is a free, open source program that is very powerful and in many ways better than Photoshop because it’s free and has a great community behind it. Because it lets you be a powerful graphics editor, too. I started playing with GIMP (or the GIMP as some say) more than a year ago, when I didn’t have Photoshop on my work computer and wanted to see how it worked.
Everyone says GIMP has a steep learning curve. They are right. Especially if you’ve never used Photoshop.
But I will show you how you can do 7 easy tricks you would do in Photoshop for absolutely free using GIMP. Of course, these are not really “tricks” in the sense that they are neither original nor groundbreaking, but after learning them and where these functions are located in GIMP, I guarantee you’ll be comfortable with GIMP and on your way to using a powerful and free open source software within a few minutes.
Here are the tricks we’ll cover:
- Resize an image
- Add a guide
- Rotate the image to correct/straighten a horizon
- Crop an image
- Change a color image into black and white
- Fix blemishes or remove unwanted things using Clone
- Add a text layer watermark
Note: Menu and toolbar names will be in bold and an indication of a nested menu item will be preceded by “>” (i.e., File > Open)
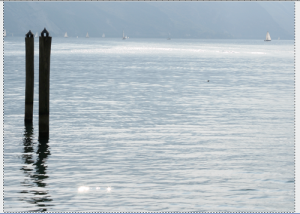
First let’s take a look at our original image we’re going to work on in GIMP.

It’s not a terrible image, right? It’s got some potential. So let’s get to work.
1. Resize an image
The last thing I usually do when working on an image for my blog or for sharing online is to resize the photo, but it may be something you have to do quite often, so let’s do that now. You won’t need an image that is 3000 pixels across if you’re posting on Flickr or something similar – usually 1000 pixels in width is a safe bet to do a quick resize. Note, this is not a crop – I am not removing anything from the image, for now.
After opening the image, navigate to Image > Scale Image to get the resize dialog box.

And here’s the dialog box. Note that the “chain link” is linked by default, meaning that GIMP will retain the proportions of the image (i.e., an image that is originally 200×100 will reduce to 100×50, etc.) If you need to resize to a specific size (i.e., 100×37) you’ll want to click on the chain to remove the proportion constraint. Also pixels is the default denomination – you can also choose inches or percent to reduce the image by 50%, etc.
Insert the new Height or Width, press your enter/return key and the other measurement will update automatically if the proportions are linked. Once you have entered the measurements you desire, click “Scale” to resize the image.

2. Add a Guide
Guides can be useful to mark the halfway point of an image, when aligning text or different layers or to help correct a horizon. In this example, we’re going to add a guide so we can do the last task.
Go to Image > Guides – then you can choose to add a guide in several ways: by percent (50% horizontally, 10% vertically, etc.), arbitrarily (by pixel) or from the selection – for this example we’ll use a simple guide by percent.

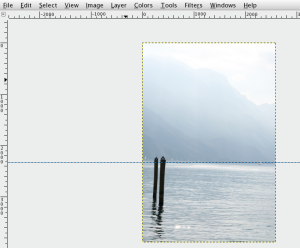
I’ll put the horizontal a little lower than the middle of the image, at 60% horizontal.

Here you can see the guide on the horizontal.

3. Rotate an image (in this case, to fix a horizontal)
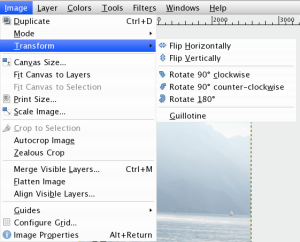
Sometimes a picture needs to be rotated because the photographer wants to give it a different look, or feeling, or sometimes you’d just like to straighten up the picture a bit. To rotate the image 90 degrees clockwise/counter-clockwise/or 180 degrees, you can easily do that with Image > Transform and then by choosing the method you’re interested in.

But what if you need to rotate the image just a little? Just a few degrees, or 10, or 45? It wasn’t completely intuitive for me to find how to rotate an image just a little bit. In GIMP you can rotate a layer just a little bit, which is why I suggest doing any rotating to the original image before adding text layers or other modifications.
To rotate the image, access it at Layer > Transform > Arbitrary Rotation:

The dialog box give you the opportunity to enter the degrees the image needs to be rotated, use a slider to rotate it arbitrarily, or you can do it directly on the image by clicking and rotating. This particular photo only needed about 2 degrees of a nudge to straighten it up.

4. Crop an image
Now the image has been straightened, but there are some “gray areas” since now the image doesn’t fill up all the rectangular space. So we need to crop it!

To crop, I usually select the area I want to keep, and then crop. First, select the Rectangle Select Tool in the Toolbox in the upper left. I like to use an additional setting to help me keep the crop in proportion with the original image – in this case it’s a vertical photo so I’m going to select “Fixed Aspect Ratio” on the lower right of the Toolbox and insert 36:54 (width:height) for my image (or 2:3). [Note: this ratio will not work for images from every camera – check your own image ratio]
Then I select the image that no gray/empty area is included in the selection. After selecting, you modify the selection by hovering the mouse at any of the four sides of the image and GIMP will let you extend/decrease the size.


Then, select Image > Crop to Selection.

Now I have an image that is straight and correctly cropped.
5. Change a color image into a black and white image
Sometimes a black and white photo can add some austerity, increase the drama of a photo, or sometimes it’s just something you want instead of the color original. There’s no need to take photos in black and white originally because you can always use software after to turn them black and white.
In GIMP there are actually two different ways to change a color image into a black and white one – by changing the mode to grayscale, or by desaturating it.
To change the mode, go to Image > Mode > Grayscale.

To change the desaturation, go to Colors > Desaturate. I usually compare the different shades with “Lightness” “Luminosity” or “Average” to see which effect I like better.

6. Remove unwanted blemishes from a photo with the Clone Tool
Let’s not turn the photo black and white just yet. Perhaps you didn’t notice that little duck in my original photo (see it there in the middle right?) or that sun glint on the water surface on the bottom left, but we’re going to remove the little guy and that glare to show you the potential of the Clone tool. Let’s take a closer look:

First select the Clone icon (the little stamp) in the Toolbox, and then the Brush size (lower in the Toolbox) you’ll need to use – if it’s a small detail, you’ll need a finer/smaller brush, if it’s a larger area, increase the size of the brush.

Then, select an area using Alt+ click or Option + Click that will be your base/reference area for the cloning. You may have to move this several times to get the effect you want. Bye bye little duckie!


And now we have a cleaner picture:

7. Add a text layer watermark
You may not like watermarks on photos (read about Understanding Copyright on this site, and more about copyrighting photos and watermarking), but I think it’s a simple precaution that many bloggers and photographers do today. You can create a watermark that’s more stylish or beautiful, but to start with, you can just add a text layer to the image and reduce its opacity so that it appears translucent.
Click on the Text Tool (A icon) in the Toolbox, then click and drag on the image where you’d like to put the text box. In the text dialog box, insert the text you want to use as your watermark – for example, your name, your domain, or your blog name.

Then, click on the layer in the Layer Toolbox and reduce the opacity from 100% to an opacity that is comfortable for your watermark. Voila!

And now my picture is ready to be saved and put online! What else would you like to know how to do with GIMP?
Here are some other GIMP tutorial sites, and information on free alternatives to Photoshop:
- 11 Outstanding (Free) Alternatives to Photoshop
- GIMP.org Tutorials
- Gimpology Tutorials
- Open Source photography pool on Flickr
- Open source software for photographers using Linux
image by yohann.aberkane
Categories: A Guide To, Photography


Great post Sara – thank you so much! I’ve been learning paint.net, another powerful freebie… but I think I’ll go back to Gimping for a while and see if I like it better… thanks again.
Thank you very much Sara. It is absolutely true that it is very difficult to understand how GIMP works at the very beginning, and I cannot get the reason of this. Kind regards and thank you again for simplicity and visibility in explaining.
Thanks Sara – my resolve is renewed! I will crack GIMP this time. I have given up on it before, but your clear explanation has made it more attractive to me to have another go.
Hi Sara, Thanks for the breakdown. I knew Gimp was the free alternative to PS; but my is it still complicated! As one other commenter said, I too will try and ‘crack’ Gimp but it’s one of those things that is going to take a long while (I’m just overwhelmed by it to be honest). But thank you for the intro and links to other Gimp helps 🙂
Good job Sara, I plan to link to this in a future article about freebie photo editors. I simply could not even do a basic thing like resize a photo in gimp despite being a pretty advanced adobe cs5 user!
Ya, it’s all about the menus and where they put everything! I’m pretty comfortable doing simple things really fast in GIMP now.
I really have to express my appreciation for this article. It has exposed me to indispensable GIMP tools I’ve been unable to learn on my own. I turned on to GIMP again after my Adobe Photoshop CC trial expired. GIMP is the first photo editor I laid my hands on. I’d not even started doing photography by this time. It was more of a play tool for me then- I used it like Paint to make illustrations. Well, that was over 4 years ago.
Presently, I’m beginning to use GIMP the proper way. Thanks to you! Now, I can’t even remember how I stumbled upon this article. GIMP tutorials are very scarce on the web, save to say a simple step by step and comprehensive self-help like this.
I visited some other articles you provided through links. They are educative as well. Thanks again!
Thanks so much! Glad it was helpful 🙂